

Oh my goodness, there is just nothing like the smell of bread made with pure, wild yeast—it smells *alive*! Honestly, baking with your own sourdough starter feels like cheating a little bit, like you’ve tapped into some ancient secret of baking. When I first tried cultivating mine, I was convinced I would fail! I remember staring at that sad little jar of wet flour on Day Three, thinking, “Why won’t it bubble?” But stick with it, because when it finally takes off? Wow! It’s magic. That’s why I put this whole thing into an easy, super straightforward timeline so you don’t have to worry about wasting time or ingredients. This guide shows you exactly how to nail that perfect, active culture right from scratch, using just flour and water. You are going to be your own baker, I promise! If you want to know more about us and why we love sharing these kitchen adventures, you can check out our little story over at our corner of the internet.
Why You’ll Love This Day-by-Day Sourdough Starter Guide
I know starting something new feels huge, especially when it comes to cultivating wild yeast! But trust me on this one; this guide is designed to remove all the guesswork. You absolutely do not need to be an expert baker to do this. In fact, the less experience you have, the better, because you won’t have old habits to break!
- It takes the guesswork out of the scary first week. Following this easy, step-by-step timeline means you know exactly what you should be looking for each morning.
- We start simply: just flour and water! There’s no need for fancy additives or purchased yeast—we are tapping into what’s naturally in your food.
- We talk you through the inevitable ‘slump.’ I’ll tell you exactly when your starter might look dead, and why you need to keep feeding it anyway. Sneaky little yeasts!
- You end up with an incredibly robust, active culture that will last you for years, giving you that unbeatable tangy flavor in all your bread.
- Everything is clear. No ambiguous instructions! We tell you when to discard, when to feed, and what the measurement goals are for your new natural bread leaven.
Gathering Supplies for Your Sourdough Starter
Before we start this week-long cultivation party, let’s make sure the kitchen is ready. I keep this process super minimal because, honestly, the less equipment you have to wash, the better, right? You don’t need fancy gadgets for a successful sourdough starter for beginners. Just a few clean things and some patience!
You’ll need about the same amount of space in your pantry or on your counter for about a week. Grab a clean jar—mine is a clear pint-sized Mason jar because I love watching the bubbles, but any clean container works. You just need a loose cover so gases can escape, so a paper towel secured with a rubber band or the jar lid placed gently on top is perfect.
Essential Ingredients for Flour and Water Starter
This is where we keep it pure. We are focusing on creating a simple flour and water starter, which is the bedrock of natural bread leaven. You only need three things, but the quality of the water matters more than you think, so pay attention here!
- 100g Whole Wheat Flour or Rye Flour – This is what we use for the very first mix to jumpstart the process because those old-school flours have more natural microbes ready to go.
- 100g Unbleached All-Purpose Flour – Once we get those initial microbes going, we switch to all-purpose for the main feeding schedule.
- 100g Unchlorinated Water (room temperature) – This is critical! Chlorine can actually kill the wild yeast we are trying to cultivate, so I always let tap water sit on the counter for a few hours to let the chlorine evaporate, or I use filtered water.
How to Make Sourdough Starter From Scratch: The Day by Day Sourdough Starter Timeline
Alright, here is the main event! This is your step-by-step playbook for the first week of how to make sourdough starter from scratch. We are going to make this process totally predictable using a day by day sourdough starter schedule. The key here is consistency in temperature. If your kitchen is cold, don’t panic; just find the warmest spot you can. I sometimes use an old, turned-off oven with just the interior light on—it creates the perfect little cozy incubator for the wild yeast to wake up!
Remember our goal is to encourage the good bacteria and wild yeast while starving the bad guys. That’s why we discard half every time—it keeps the population manageable and well-fed. If you ever need a refresher on what to bake once you’re done, pop over to our breakfast recipes!
Days 1 and 2: Initial Mixing and Waiting
Day One is so exciting because you finally mix ingredients! Grab a clean jar and mix 50g of that coarse whole wheat or rye flour with 50g of your dechlorinated, room-temperature water. Mix it until it looks like pancake batter—no dry bits stuck anywhere. Now, cover it loosely. Seriously, loosely! If you seal it tight, any gas buildup will turn your jar into a small explosive device, and nobody wants that cleanup! Just lay the lid on top or use plastic wrap poked with a few holes.
Day Two, you might see a tiny bubble or two, or you might see nothing at all. It’s fine either way! If you see some separation, just give it a quick stir. Then, we perform our first essential step: discard half of whatever you have, and feed the remainder with 50g of your All-Purpose Flour and 50g of water. Mix it, cover loosely, and walk away for 24 hours.
Days 3 and 4: Recognizing Early Activity
By Day Three, you should definitely see some signs of life—maybe some small, slow bubbles forming, perhaps smelling a bit vinegary or even cheesy. That’s normal! You repeat the exact same ritual as Day Two: discard half, and feed the rest with 50g AP flour and 50g water. Mix it up, cover it loosely, and wait another 24 hours.
Now, listen closely, because this is where most people quit: Day Four often brings the dreaded ‘slump.’ The initial burst of activity from the first few days dies down because the first set of microbes has eaten all the easy food. Your starter might look totally flat and smell a bit funky. Do NOT give up here! This is the point where the hardier, more complex wild yeast population is fighting to take over. You must stick to the schedule! Discard half, feed 50g AP flour and 50g water. Keep that routine going for another 24 hours.
Days 5 to 7+: Achieving a Bubbly Sourdough Starter
If you survived Day Four’s slump, congratulations! You are in the home stretch. Starting on Day Five, your starter should start showing real, consistent activity again. We slightly shorten the feeding interval now to give those stronger yeasts more food. Discard half, and feed with 50g AP flour and 50g water. But this time, check it in 12 hours, not 24.
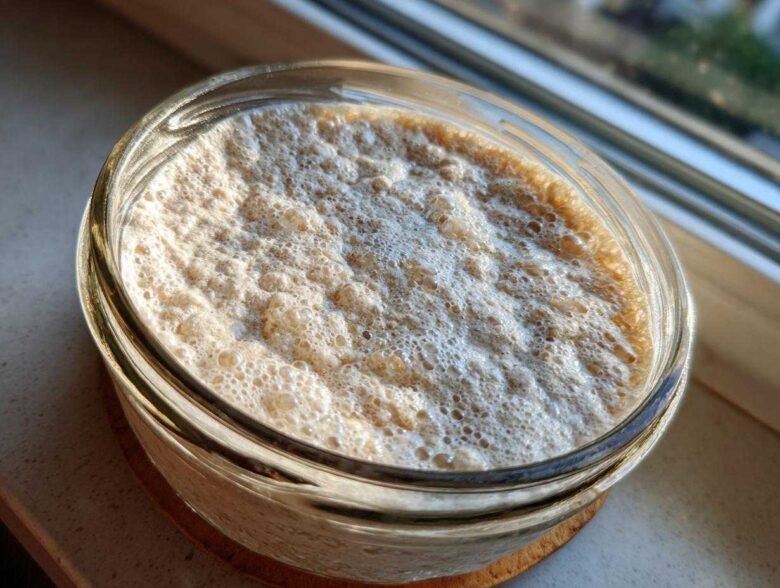
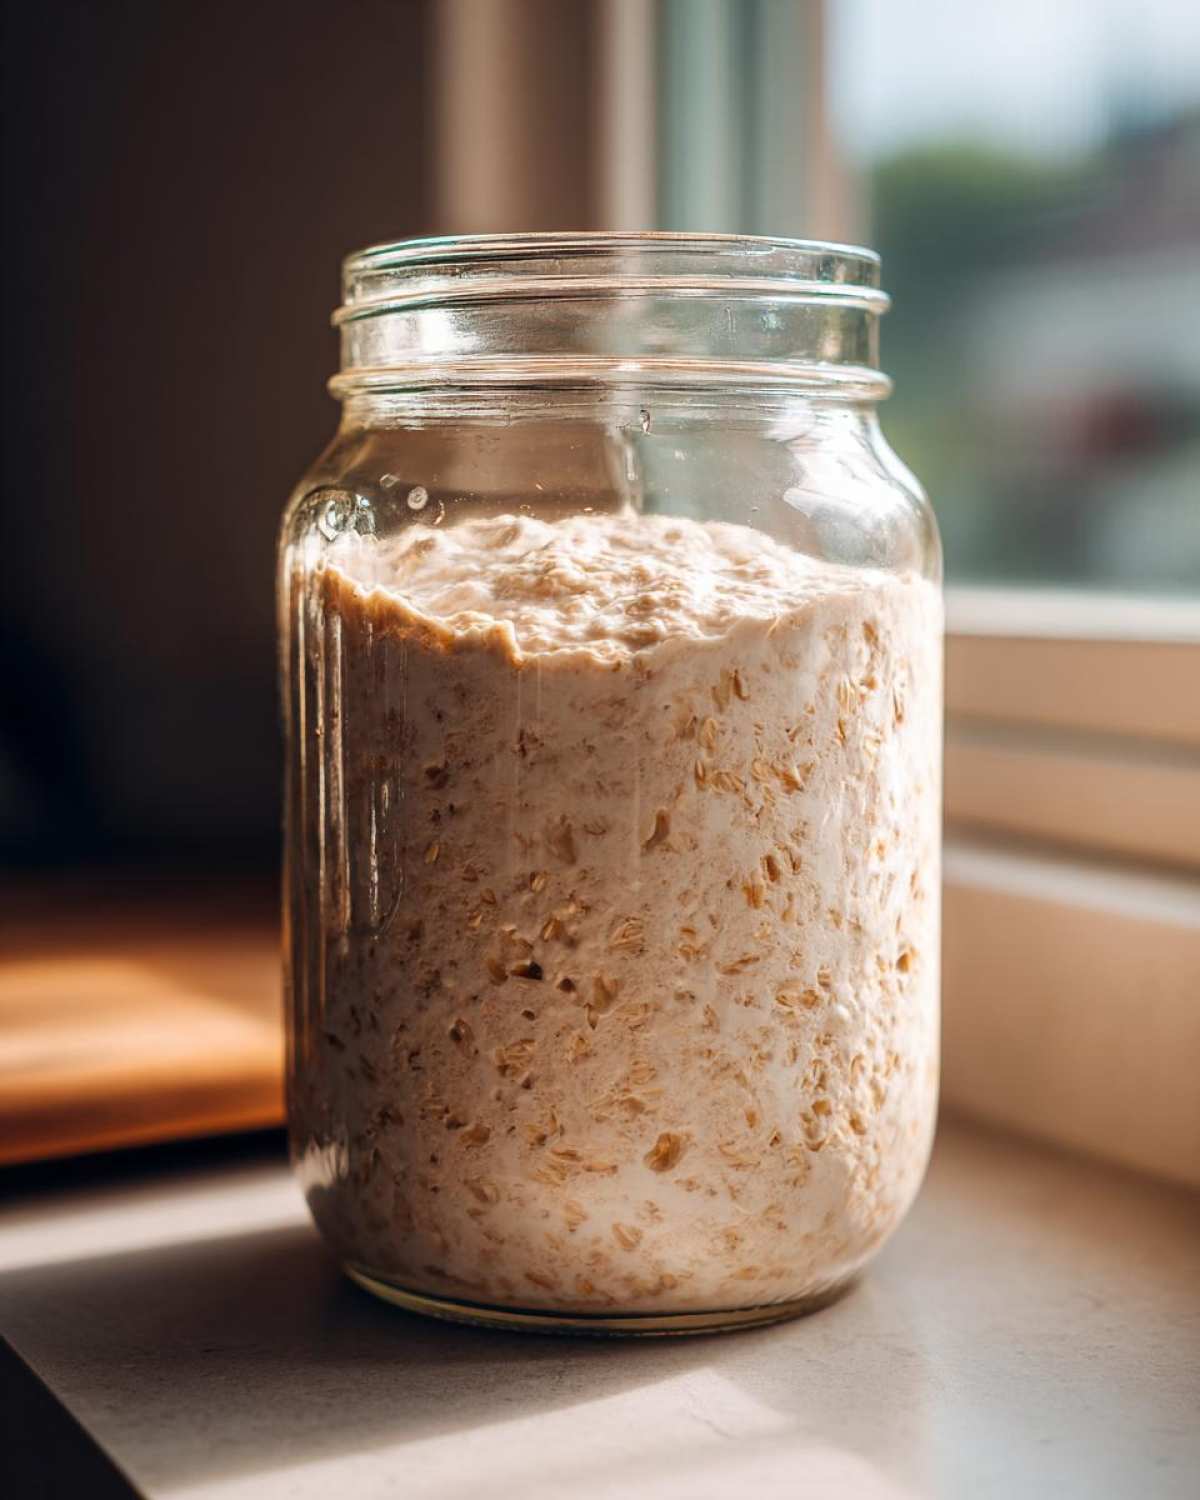
From Day Six onward, we start moving toward maturity. You should be looking for that beautiful, bubbly sourdough starter that consistently doubles in size within 4 to 8 hours after you feed it. You’ll see it rise up into a nice dome shape just before those bubbles burst it back down. That doubling action is what we call ‘active.’ Once you see it doubling reliably for two feedings in a row, you’ve made a mature starter! That means you’ve successfully completed the day by day sourdough starter process!
Sourdough Starter Ratios Explained for Maintenance
Okay, once your beautiful culture is mature and doubling happily, you have to decide how you want to keep it around. This is where understanding your sourdough starter ratios explained really comes in handy! It sounds super mathematical, but it’s actually just about how much flour and water you give your starter versus how much you throw away. It’s all based on weight, which keeps things reliable.
The ratio is always written as Starter:Flour:Water. For example, the initial mix we used was a 1:1:1—one part starter, one part flour, one part water by weight. That’s a pretty hungry ratio, which is why we fed it twice a day for a while. That’s great for activation, but you don’t want to waste that much flour if you’re just keeping it on the counter.
If you plan to keep your starter at room temperature and feed it every day (which is called maintaining it “at peak”), 1:1:1 or a 1:2:2 ratio works well to keep it active and happy. It’s a consistent feeding schedule that keeps that wild yeast nice and busy.
But here is the real secret for most of us home bakers: if you plan to store your starter in the fridge, you want to use a much smaller ratio, like 1:3:3 or even 1:4:4. You only feed it once a week, so you want to give it a huge meal that will last until the next time you pull it out. Less starter means less waste, and you just feed it a big ratio a day or two before you plan to bake again. See? Not complicated at all once you realize it’s all just about managing mealtime!
Feeding Sourdough Starter Guide: Keeping Your Culture Thriving
Now that you’ve done the hard work and nurtured your baby culture from wet flour into a powerful living thing, the next question is always, “How do I keep this alive without feeding it every 12 hours?” That’s what this feeding sourdough starter guide is for! The key here is storage location. Your kitchen temperature dictates how often your little ecosystem needs food.
If you are baking multiple times a week or just love having that strong culture ready to go on the counter, you have to feed it daily. Keep it cozy in the same 1:1:1 or 1:2:2 ratio we talked about, trying to feed it at the same time every day so it gets into a rhythm. Remember, room temperature means active growth!
But let’s be real, most of us have lives that don’t revolve around feeding flour mush! That’s why the refrigerator is your best friend. Popping your starter into the fridge dramatically slows down the yeast activity. When it’s chilling out in the cold, you only have to feed it about once a week. I love this method because it saves flour and time.
When it’s time to pull the refrigerated starter out to bake, you can’t just scoop it out and throw it into your dough recipe. You need to wake it up! Take it out of the fridge, give it a small feed (maybe a 1:2:2 ratio), let it sit on the counter for a few hours, and discard most of it. Then, keep feeding it every 12 hours at room temperature until it’s doubling reliably again. That’s how you know you have a truly active sourdough starter.
Speaking of knowing, how do you confirm it’s ready to bake? Forget just looking at the jar sometimes—you need the float test! This is my favorite E-E-A-T tip from my early baking days. Take a tiny spoonful of your starter right when it looks like it has peaked (usually right before it starts to collapse). Gently drop that spoonful into a glass of room-temperature water. If it floats, you’re golden! It means it’s full of gas, light, and ready to lift that bread. If it sinks? Give it one more feeding and try again later. No big deal! If you need to get in touch with me with any frantic questions during your first bake, you can always find the contact info right here.
Tips for Success with Your Sourdough Starter for Beginners
Look, I know that first week can feel like you’re desperately trying to raise a very moody pet! But once you get past the initial creation phase—which we conquered with our day-by-day guide—keeping it going is actually super simple. These are the tried-and-true things I learned over years that stopped me from throwing my starter away. These little tricks are the key to success when you are just starting out with your sourdough starter for beginners.
First, you absolutely must use a clear jar. I cannot stress this enough! You think you know what’s happening inside, but trust me, you don’t. You need to see the rise and, more importantly, the fall! Tracking how tall it gets after you feed it is vital for knowing if the yeast is happy. If you’re unsure if it’s peaked, mark the jar with a rubber band right where the starter level is immediately after feeding. Seeing that 50% rise is the best visual reminder that your hard work is paying off!
Second, temperature is everything, especially in the beginning. If you are struggling to see any activity at all—I mean zero bubbles by Day Three—the yeast is probably taking a nap because it’s too cold. Don’t worry, that oven light trick I mentioned? That’s your best friend. Turn your oven light on, but leave the oven itself OFF. Check the thermometer if you have one, but generally, that little light bulb keeps the oven cavity warm enough (around 75°F) to really encourage the wild yeast cultivation process along until they get established.
Third, don’t get obsessed with the smell right away. When you are feeding it every day, it’s going to smell sharp, maybe like vinegar, maybe like acetone—it’s weird, but it means the acid levels are high, which is protective! You want that strong smell to signal that it’s hungry. Once it matures and you start feeding it regularly with a good ratio, the smell will mellow out into that beautiful, slightly tangy, yogurt-like aroma we all crave for our recipes. Don’t confuse a strong sour smell for a dead starter; it just means the ecosystem needs a fresh meal!
Finally, remember that once your starter is consistently doubling within 4 to 8 hours after feeding—meaning it’s an active starter—it’s ready for baking! If you end up with more than you need, don’t stress about waste. Just remember that every bit of discard is usable later on. If you ever need to look over the fine print on anything regarding this site, you can check our disclaimer page.
What to Do with Sourdough Discard Recipes Starter
Okay, surviving that first week means you now have an abundance of starter culture, and you are probably looking at that jar thinking, “What on earth do I do with all this leftovers?” Because if you are keeping your starter active on the counter, you are forced to discard half your volume just to keep it fed properly! But please, don’t pour your precious, wild-yeast-infused baby down the sink! That discard might not be “active” enough to raise a big loaf of bread immediately, but it is absolutely full of flavor and microbial goodness.
Learning to utilize discard recipes starter is the key to zero waste in your sourdough journey. You are essentially using a slightly older, less bubbly version of your starter to add tang and texture to things that don’t rely on that super strong doubling power to succeed. It’s honestly one of my favorite parts because it means less waste and more snacks!
The absolute easiest thing to make—and the one I recommend you try first—is crackers. You just mix the starter discard with a little bit of olive oil, salt, and whatever herbs you have lying around. Roll it super thin, bake it until it’s crisp, and bam! You have incredible cheddar-and-chive sourdough crackers that everyone begs you for. They take maybe ten minutes of active work.
Another fantastic option? Pancakes or waffles! Even though the starter isn’t at its peak strength, that tiny bit of natural leaven and the acidity in the discard works wonders in batter. It gives them this amazing, subtle tang that elevates them way beyond the basic buttermilk version. You can find a great starting point for that over at my favorite breakfast spot!
And honestly, if you don’t feel like baking right away, just keep throwing that discard into a separate container in the fridge. You can collect it for days! Once you have a big jar full, you can use that entire volume to make something truly massive, like a huge batch of savory pancakes for the family or even quick sourdough biscuits. It’s all about repurposing that flavorful byproduct!
Understanding Your Natural Bread Leaven
So, what have you actually created here this past week? You didn’t just make mush in a jar, my friend—you cultivated a genuine natural bread leaven! Think about that for a second! You’ve harnessed something incredible using nothing but that flour and water combination. We’ve been talking about the process, but it’s important to pause and appreciate what this means for your baking future.
What you have now is a living colony of wild yeast and bacteria. This is the original way people made bread before we had bags of active dry yeast sitting on the shelf. Commercial yeast is basically one specific, fast-working strain that bakers isolate and mass-produce. It’s reliable, sure, but it’s also a bit of a one-note player in the flavor department.
Your starter, on the other hand, is full of complexity! Those different strains working together create lactic and acetic acids during fermentation. Those acids are what give your final loaf that wonderful, soft tang that everyone loves about real sourdough. It’s why people talk about the ‘terroir’ of bread, referring to the local environment affecting the yeast!
This natural leaven is the entire foundation for what we call sourdough beginner baking. Once you have this active culture, you are no longer just mixing ingredients; you are engaging in a form of food alchemy! It’s a connection to history, honestly. It means your bread will have a potentially better texture, better keeping qualities (it lasts longer on the counter!), and definitely a better flavor profile than anything you can whip up with store-bought yeast.
And don’t forget the maintenance side of things. If you ever need details on our site usage or privacy rules, you can always check those out right here on our policy page. But for now, enjoy knowing you’ve got something deeply special living on your counter!
Frequently Asked Questions About Your Sourdough Starter
I get so many questions flooding my inbox once people start this process! It usually means they are watching their jar intensely, which is exactly what you should be doing. Here are the most common things I hear from folks who are just getting their own sourdough starter for beginners up and running. Don’t worry if your experience doesn’t match mine exactly—these little wild yeast colonies have minds of their own!
How long does it take for a sourdough starter to become active?
This is the million-dollar question! I tell everyone to plan for a full seven days when following our day by day sourdough starter timeline, but ‘active’ really depends on consistency, not just the calendar date. You are officially active when your starter reliably doubles in size (it grows 100% taller than where you fed it) within about 4 to 8 hours after a feeding, and it smells pleasantly tangy, not sharp or vinegary. Sometimes this happens on Day Six, sometimes it takes until Day Ten if your kitchen is chilly. The most important thing is that it’s consistently doubling, not just having a random bubbly day!
Can I use any flour to make a sourdough starter for beginners?
You absolutely can, but you shouldn’t if you want the fastest results! When you’re trying to create your very first flour and water starter, I strongly recommend starting with a whole grain like rye or whole wheat for the first day or two. Why? Because those flours contain more of the natural microbes and enzymes that the wild yeast thrive on. Once you see your starter doing well—maybe Day Three—then you can switch over to the all-purpose or bread flour for your regular feedings. Using whole grain initially just gives you a head start in that initial wild yeast cultivation!
What does a ‘bubbly sourdough starter’ actually look like?
Oh, the joy of seeing a truly bubbly sourdough starter! It’s so satisfying. When it hits its peak, it shouldn’t just look puffy; it should look sturdy. You want to see a lovely dome shape forming on the top, almost like a little tan cloud sitting in the jar. When you peek close, you’ll see hundreds of bubbles trapped inside, ranging from tiny pinpricks to medium-sized ones. If you gently nudge the jar, the whole mass should jiggle—it won’t be one solid lump anymore. That airy, bubbly structure means it’s full of gas and ready to make your bread rise high!
PrintDay-by-Day Guide to Creating Your Sourdough Starter From Scratch
Follow this simple, step-by-step timeline to cultivate your own active sourdough starter using only flour and water.
- Prep Time: 5 min
- Cook Time: 0 min
- Total Time: 7 days (for initial activation)
- Yield: 1 active starter culture
- Category: Baking Basics
- Method: Wild Yeast Cultivation
- Cuisine: General
- Diet: Vegan
Ingredients
- 100g Whole Wheat Flour or Rye Flour
- 100g Unbleached All-Purpose Flour
- 100g Unchlorinated Water (room temperature)
Instructions
- Day 1: Mix 50g whole wheat/rye flour with 50g water in a clean jar. Cover loosely and let sit at room temperature (68-75°F) for 24 hours.
- Day 2: You may see little activity. Discard half the mixture. Feed the remaining starter with 50g all-purpose flour and 50g water. Mix well, cover loosely, and wait 24 hours.
- Day 3: You should see some bubbles. Discard half. Feed with 50g all-purpose flour and 50g water. Wait 24 hours.
- Day 4: Activity might slow down. Discard half. Feed with 50g all-purpose flour and 50g water. Wait 24 hours.
- Day 5: You should see more consistent bubbles. Discard half. Feed with 50g all-purpose flour and 50g water. Wait 12 hours.
- Day 6: Feed again 12 hours later using the same 1:1:1 ratio (discard half, feed 50g flour, 50g water). Look for doubling in size within 4-8 hours after feeding.
- Day 7+: Continue the 1:1:1 feeding schedule every 12 or 24 hours until the starter consistently doubles in volume a few hours after feeding. This means your wild yeast cultivation is active.
Notes
- Use a clear jar so you can track the rise and fall of the starter.
- If your kitchen is cold, place the jar in a slightly warmer spot, like inside an oven with only the light on.
- A mature, active starter should float when a small spoonful is dropped into a glass of water.
- Maintain your starter by feeding it daily when kept at room temperature.
Nutrition
- Serving Size: 100g culture
- Calories: 180
- Sugar: 0.5
- Sodium: 1
- Fat: 0.5
- Saturated Fat: 0.1
- Unsaturated Fat: 0.4
- Trans Fat: 0
- Carbohydrates: 37
- Fiber: 2
- Protein: 5
- Cholesterol: 0